Installing World of Warcraft (WoW) in
Ubuntu or Linux Mint (with Wine) is pretty easy, however there are
various crashes that can occur, especially if you're not using the
latest Wine and also, the FPS can be pretty low without a few tweaks, so
I though I'd document everything I did to get World of Warcraft to work
properly on my laptop (Nvidia Optimus, so I was able to test the game
with both Nvidia and Intel graphics), even in large scale PvPs and
hopefully, this will help you play WoW under Ubuntu or Linux Mint.
Install World of Warcraft in Ubuntu / Linux Mint
1. Download the WoW installer (you can of course use a CD/DVD instead).
2. Optional but recommended Install the latest Wine development release:
sudo add-apt-repository ppa:wine/wine-builds
sudo apt-get update
sudo apt-get install --install-recommends wine-devel winehq-devel
For better FPS with the dxd9 gxapi, you can use Wine Staging with the CMST option enabled (but note that wine-staging tends to get buggy from time to time).
3. Right click the downloaded installer, right click it and select Open With > Wine Windows Program Loader (update: with newer Wine versions, double clicking the installer should work too):
Then install Battle.net:
Update: a recent Battle.net update broke the UI for Linux users with Intel graphics. You can find a workaround here: Partial Workaround For Black / Distorted Battle.net UI On Linux (Wine) With Intel Graphics
4. And finally, launch Battle.net from the menu / Dash (the icon should also be on your desktop unless you've deselected that option) and install World of Warcraft:
Fixing various potential World of Warcraft crashes (Ubuntu / Linux Mint w/ Wine)
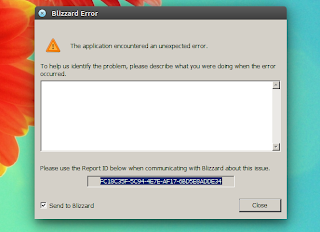
A. If the World of Warcraft installer / Battle.net crashes
If Battle.net crashes on start:
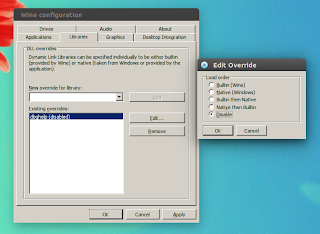
Fix it by launching winecfg (type "winecfg" in a terminal) and on the Libraries tab, under "New override for library", enter "dbghelp"
(without the quotes), then click "Add". Next, select "dbghelp" under
"Existing overrides" and click "Edit" and in the new pop-up, set it to "Disable":
Update August 2016: after some Battle.net update, the app crashes due to some issues with msvcp140. To fix this issue, open winecfg (type "winecfg" in a terminal), and on the Libraries tab, enter "msvcp140", then click "Add".
Next, select "msvcp140", click "Edit", and set it to "Native then Builtin".
Update 2 August
2016: if Battle.net still crashes, change the "dbghelp" library override
settings (see above) to "Native, then Builtin".
B. If you're on 64bit and the World of Warcraft 64bit game client crashes with an error similar to this:
ERROR #132 (0x85100084) Fatal exception!

Program: C:\Program Files\World of Warcraft\Wow-64.exe
ProcessID: 57
Exception: 0xC0000005 (ACCESS_VIOLATION) at 0033:0000000005A11A71

The instruction at "0x0000000005A11A71" referenced memory at
"0x00007F38ACD6C028". The memory could not be "read".
...
you'll need to force World of Warcraft to use the 32bit client. If you
use Battle.net to launch the game (that's only possible if you don't use
OpenGL, see below), you can change WoW to use the 32bit client from the
Battle.net settings available via left-click on the blue icon on the
top-left Battle.net corner - the menu is not responsive and
unfortunately you have to click quite a few times to get it to work.
Or, you can launch World of Warcraft
using a script - adding "-noautolaunch64bit" will force the 32bit WoW
client to be launched instead of the 64bit one. If you're already using a
script, simply add "-noautolaunch64bit" at the end of your WoW launch
command. Or, if you're not using a script already, create a new text
file in your home folder - let's call it "wow" and in this file, paste
the following:
on Ubuntu / Linux Mint 32bit:
#!/bin/sh

WINEDEBUG=-all wine "/home/YOURUSERNAME/.wine/drive_c/Program Files/
World of Warcraft/WoW.exe" -noautolaunch64bit(replace "YOURUSERNAME" with your username; you may need to adjust your WoW.exe path!)
on Ubuntu / Linux Mint 64bit:
#!/bin/sh

WINEDEBUG=-all wine "/home/YOURUSERNAME/.wine/drive_c/Program Files
(x86)/World of Warcraft/WoW.exe" -noautolaunch64bit(replace "YOURUSERNAME" with your username; you may need to adjust your WoW.exe path!)
Then save the file and make it
executable using the following command (assuming you've created the
"wow" file in your home directory):
chmod +x ~/wow
Then
double click the "wow" file and run it to launch WoW (you can also
launch it from the command line using "~/wow", or edit the World of
Warcraft desktop file to point to your newly created script).
C. 64bit only: if you're using Bumblebee and World of Warcraft crashes with the following error:
X Error of failed request: GLXUnsupportedPrivateRequestsudo apt-get install virtualgl-libs:i386
D. If World of Warcraft fails at
the login screen (it's unable to connect) when launching the game
through Battle.net and you're using the OpenGL gxapi, you'll find a work-around below, under the WoW Linux/Wine optimizations and tweaks - see "A. Use OpenGL".
Optimizations and tweaks (increase the World of Warcraft FPS under Linux, etc.)
There are numerous reports saying that
World of Warcraft runs better using OpenGL. In my test, I did indeed
get a much higher FPS when using Nvidia graphics, but not using Intel
graphics. However, this depends on hardware so it may not be the case
for you.
Unfortunately, running World
of Warcraft with OpenGL from Battle.net is not possible at the time I'm
writing this article, at least it wasn't in my test (and there are
others who are experiencing the same issue) because World of Warcraft
fails to connect. There is a work-around though.
To get World of Warcraft to
connect when using OpenGL, you need to launch it using a script. To do
this, create a new text file in your home folder - let's call it "wow"
and in this file, paste the following:
On Ubuntu / Linux Mint 32bit:
#!/bin/sh

WINEDEBUG=-all wine "/home/YOURUSERNAME/.wine/drive_c/Program Files/
World of Warcraft/WoW.exe" -opengl(replace "YOURUSERNAME" with your username; you may need to adjust your WoW.exe path!)
On Ubuntu / Linux Mint 64bit:
#!/bin/sh

WINEDEBUG=-all wine "/home/YOURUSERNAME/.wine/drive_c/Program Files
(x86)/World of Warcraft/WoW.exe" -opengl(replace "YOURUSERNAME" with your username; you may need to adjust your WoW.exe path!)
For Nvidia-users only: for threaded OpenGL performance optimization, add "__GL_THREADED_OPTIMIZATIONS=1" to the script you've just created, before "wine". After modifying the script, it should look like this:
- On Ubuntu / Linux Mint 32bit:
#!/bin/sh

WINEDEBUG=-all __GL_THREADED_OPTIMIZATIONS=1 wine "/home/YOURUSERNAME/
.wine/drive_c/Program Files/World of Warcraft/WoW.exe" -opengl(replace "YOURUSERNAME" with your username; you may need to adjust your WoW.exe path!)
- On Ubuntu / Linux Mint 64bit:
#!/bin/sh

WINEDEBUG=-all __GL_THREADED_OPTIMIZATIONS=1 wine "/home/YOURUSERNAME/
.wine/drive_c/Program Files (x86)/World of Warcraft/WoW.exe" -opengl(replace "YOURUSERNAME" with your username; you may need to adjust your WoW.exe path!)
Note: I've used "WINEDEBUG=-all" to turn off debugging output to improve performance a little bit further.
Next, make the script executable (the
following command assumes you've called the script "wow" and created it
in your home folder):
chmod +x ~/wow
Then
double click the "wow" file and run it to launch WoW (you can also
launch it from the command line using "~/wow", or edit the World of
Warcraft desktop file to point to your newly created script).
That's not all. To boost the WoW FPS, also perform the following tweak: press ALT + F2, enter "regedit" (without the quotes) and:
- navigate to HKEY_CURRENT_USER -> Software -> Wine, select the Wine folder and right click it, then select New -> Key and rename the newly created key to "OpenGL" (without the quotes);
- select the "OpenGL" key, right click it and select New -> String Value;
- rename "New Value #1" to "DisabledExtensions" (without the quotes);
- double click on the newly created "DisabledExtensions" and enter "GL_ARB_vertex_buffer_object" (without the quotes) into the "value" field.
B. Intel graphics only
If you see black textures in the game or the game crashes, enable S3TC texture compression by following the steps below:
Firstly, install driconf:
sudo apt-get install driconf
Then launch driconf:
it should show up as "3D Acceleration" in the menu/Dash (you can also
launch it by pressing ALT + F2 and entering: "driconf") and on the Image
Quality tab, set "Enable S3TC texture compression even if software
support is not available" to "Yes", then close the window.
C. If you're still getting low FPS, here are a few game configuration tweaks (Config.wtf)
To be able to use the tweaks
below, you need to run World of Warcraft at least once, or else the
configuration file doesn't exist.
Open the Config.wtf file with a text editor (the file should be located under ~/
Open the Config.wtf file with a text editor (the file should be located under ~/
.wine/drive_c/Program Files (x86)/World of Warcraft/WTF/) and paste this:
SET M2UseShaders "0"
SET UseVertexShaders "0"
SET useWeatherShaders "0"
SET ffxGlow "0"
SET ffxDeath "0"
SET ffxSpecial "0"
SET weatherDensity "0"
SET reflectionMode "0"
SET maxFPS "60"
SET ffx "0"
SET maxFPSbk "5"
SET mapShadows "0"
Other tweaks:
- Using some WoW addons can considerably lower your FPS so if the FPS is bad, you can try removing them (note that you'll have to remove the addons and not just disable them!) and see if that improves your FPS;
- For better performance, you can try the latest Wine Staging.
- For Ubuntu 14.04 and 14.10 / Linux Mint 17 and 17.1, you can use the Oibaf PPA (it requires Linux kernel >= 3.17 and wine from THIS PPA) which includes updated graphics drivers as well as Gallium Nine support which should get you a FPS boost in World of Warcraft with Direct3D.
- Update your graphics drivers - for Nvidia, you can use a PPA.
Update: for a couple of Curse-compatible applications that work on Linux, which you can use to install or update WoW addons via curse.com, see THIS article.
Are you playing World of Warcraft under Linux? What other optimizations / tweaks have you used?
Run Microsoft Windows Applications and Games on Mac, Linux or ChromeOS save up to 20% off CodeWeavers CrossOver+ today.


